
Last revised July 17th 2017
If mobile device is blocking installation of the application, the mobile device settings will need to be changed to enabled "Unknown Sources". This setting can often be found in the Lock Screen or Security section of the mobile device settings.
Downloading the Mobile App.
1. Search "iConDimmer" in the App store (for Apple devices) or in the Play Store (for Android devices).
2. Download the "iConDimmer" app onto the mobile device.
The Login screen is the first screen that the user will be presented with upon opening the mobile app. From this screen, the user can enter their login credentials or setup a new network.
To log in to user account:
1. Type in the correct Login Name and Login Password into the respective input fields.
2. Choose either Local or Remote access.
Local: Access through the designated Wi-Fi network – user must be within range of Wi-Fi router to successfully connect locally.
Remote: Access through the cloud server – user does not need to be within range of Wi-Fi router to successfully connect.
Network Setup Process
1. Connect the supplied AC-DC adapter into the 5V input jack. The green light on the iCon will appear, indicating that the device is powered.
If this is the first time setting up, the iCon will pause in about 1 minute with both orange and green lights activated. When this occurs, the device is in stand-by mode with its Bluetooth turned on, awaiting network configuration from the mobile app.
If the device has already been setup with an existing Wi-Fi network, the device will re-connect automatically on its own and halt with only the green light activated within about 3 minutes.
2. Ensure that the mobile device is connected to the designated Wi-Fi network and that Bluetooth is enabled. Run the app.
3. From the Login screen, select SETUP to go to the Network Setup screen.
4. Choose either Static IP or Dynamic IP. In most cases, Dynamic IP would be the ideal setting.
5. Select "Yes" when attempting to establish Bluetooth connection with the iCon.
6. Once connected, the Dynamic IP Setup screen appears with the iCon's MAC ADDRESS shown at the top (e.g. 00:07:80:XX:XX:XX)
Enter a login name and login password. This will be the user's login credentials whenever the app is opened.
Enter the Wi-Fi network password into the third box. Ensure that the title at the top of the third box is the name of the desired Wi-Fi network. Hide or show the password on the screen while inputting the password.
7. Once all three items are inputted, select SETUP. Both green and orange lights will remained activated throughout this process.
Once the network setup is complete and the iCon is ready, the orange light will turn off and only the green light will remain activated. The app will automatically return to the Login screen.
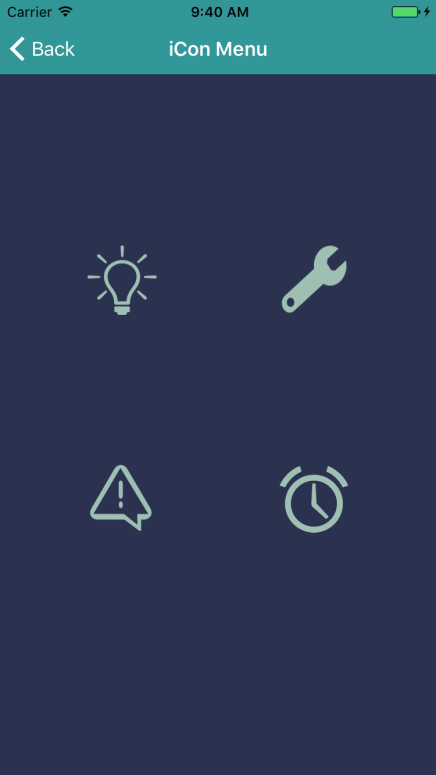
The iCon Menu
The iCon Menu screen is the main screen of the mobile app. From this screen, the user will be able to navigate the app by accessing other screens.
Top Left: Lightbulb – Dimmer Control screen
Top Right: Wrench – Zone Setup screen
Bottom Left: Exclamation Mark – Factory Erase screen
Bottom Right: Clock – Zone Alarms screen
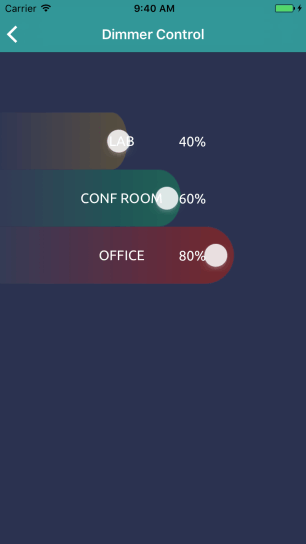
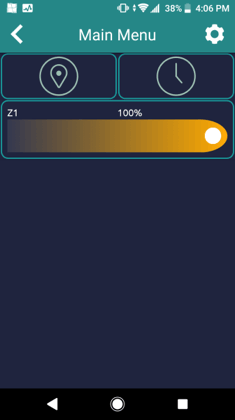
Dimmer Control Screen
On the Dimmer Control screen, the user will be able to adjust the brightness of each individual zone in the network. Each zone has an individual slider that can be adjusted from 0% to 100% brightness.
1. To adjust the brightness of a zone, hold and drag the end of the slider left or right to decrease or increase brightness.
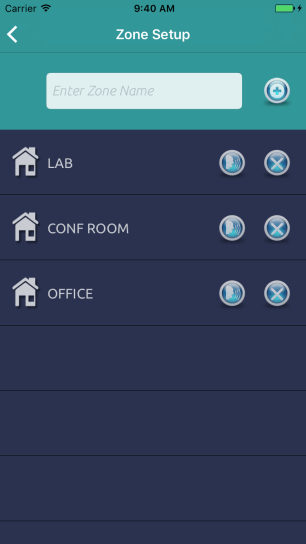
Zone Setup Screen
On the Zone Setup screen, the user will be able to manage the network of zones by creating and deleting zones.
1. To begin creating a zone, ensure that all dimmers associated with the zone intended to be created are turned on. All dimmers not intended to be associated with this new zone must be powered off.
2. Once completed, begin typing the zone name into the "Enter Zone Name" field at the top of the screen. Select the ✙ button to create the new zone.
3. Once the iCon has retrieved all information for the new zone, the lights of the new zone will repeatedly turn on and off for about 5 seconds. The dimmer will then set the lights of the new zone to maximum (100%) brightness. The zone is now successfully programmed.
- - -
1. To add a new light to an existing zone, first ensure that the dimmer of the new light and lights in the existing zone are powered on. All other lights should be powered off.
2. Select the sync button (talking face icon) that corresponds with the zone you intend to add the new light to. This will now re-create the zone with the new light included.
- - -
1. To delete an existing zone, simply select the x button that corresponds with the intended zone.
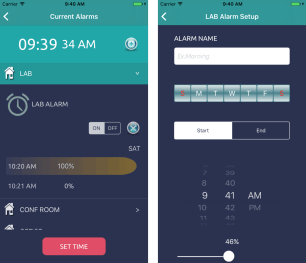
Zone Alarms Screen
On the Zone Alarms screen, the user will be able to schedule when certain zones will be powered on and off and adjust the brightness of each zone at any given time. Alarms can be set by the minute for any day of the week.
This screen displays all the different zones in the network. When a zone is selected, any alarms set for that zone will drop down and be displayed.
- - -
1. To set the real-time clock for the iCon, select the Set Time button at the bottom of the screen.
2. Set the real-time clock by adjusting the dials. Select "Done" when finished. This set time will save into the iCon and will continue to run, even when main power is not connected. However, if the main power is disconnected for more than 24 hours at the end of the month, it is highly recommended that the real-time clock is re-set in order to avoid missing days due to the month rollover.
- - -
1. To set an alarm, first select the zone to add an alarm to. Once selected, press the + button at the top-right of the screen.
2. The Alarm Setup screen, will appear where various settings can be adjusted.
A. Set the name of the alarm under Alarm Name.
B. Set which days of the week the alarm should be active.
C. Set the start/end time of the alarm.
D. Set the start/end brightness of the alarm.
Once finished, select "Save" at the bottom of the screen. This will activate the alarm.
- - -
1. To activate or deactivate an existing alarm, find the alarm on the Zone Alarms screen and select either "ON" or "OFF" on the ON/OFF switch.
- - -
1. To delete an existing alarm, simply select the x button that corresponds with the intended alarm.
There may be instances where the user wants to relocate an already programmed dimmer from one zone to another. In order to do this, the user must reset the dimmer by erasing the zone setting stored in that dimmer before relocating. To erase the zone setting stored in a dimmer, follow these steps:
1. On the iCon Menu screen, select the exclamation mark icon at the bottom-left to go to the Factory Erase screen.
2. After reading the warning mesage that pops up, select "Yes".
3. When asked if the user would like to "Turn on light connectability", select "Yes".
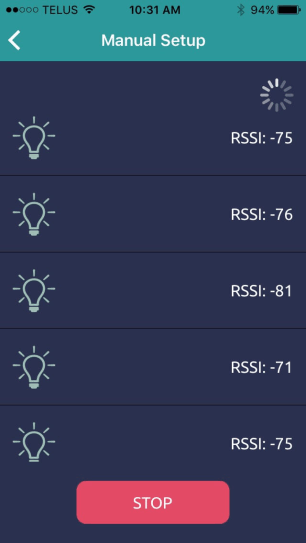
4. Power on the lights and select "Scan". Note that the user has 10 seconds to scan; After the 10 second frame, the lights will not be detectable. If the 10 second frame is missed, the user must power cycle the lights and restart the process.
5. A list of lights will be displayed on the screen with their corresponding Receive Signal Strength Indicator (RSSI) number on the right. Move the dimmer directly next to the dimmer that needs to be reset. The RSSI value for the correct dimmer should be the highest value; typically around -40. Note: RSSI values are negative, and therefore the highest value is the one that will be closest to zero.
6. Select the dimmer with the highest value. A pop-up screen will appear, reading "Proceed with light that dimmed/turned off?". Ensure that the light the user is connected to flashes. If it does, select "Yes" to begin erasing. If it does not, try again.
7. A message reading "Task Complete" will appear when the dimmer is successfully erased. The light should repeatedly flash once the dimmer is erased. The dimmer can now be relocated.
To configure the Occupancy Sensor, tap on the setup button at the top right corner of the screen.
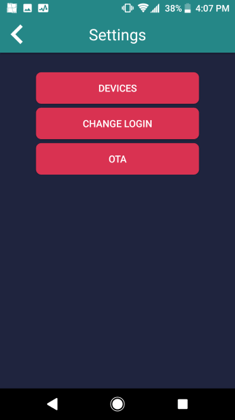
Tap on the DEVICES button and select YES when a warning message appears.
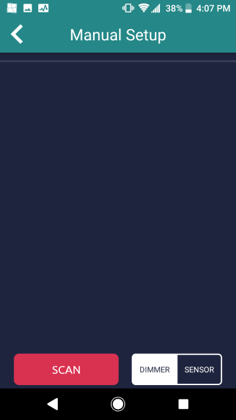
Walk close to the sensor that you want to configure and tap on the SENSOR button at the lower right corner of the screen.
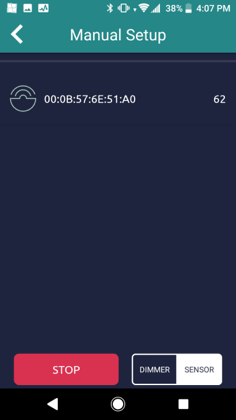
The app will list all Occupancy Sensors it can detect in the area. The sensor that is closest to the phone will be listed at the top of the list with the smallest number on the right. To select the sensor, simply tap on the sensor from the list.
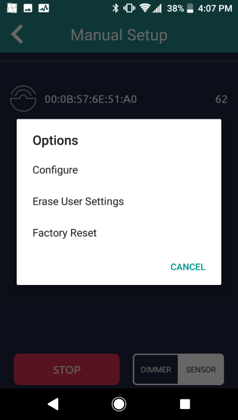
You will be given an option to configure the sensor, to erase al l user settings, or to reset the sensor back to factory. Tap on Configure and answer YES to continue. Both yellow and green status light on the Occupancy Sensor will be turned on once a connection is established.
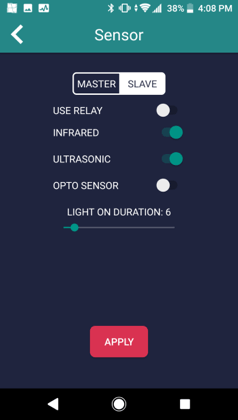
If the opto sensor is enabled, you will be given the option to select three different levels of sensitivity. These levels of sensitivity correspond to the level of ambient light detected by the opto sensor. Move the slider to set the desire delay time (in minutes) for your lights. Tap on APPLY when you are done.
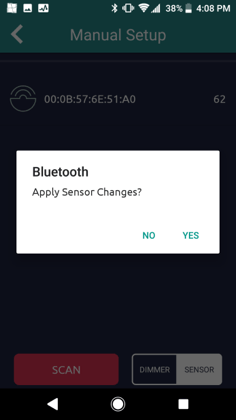
To store the setting to the sensor, simply tap on YES to complete the configuration.
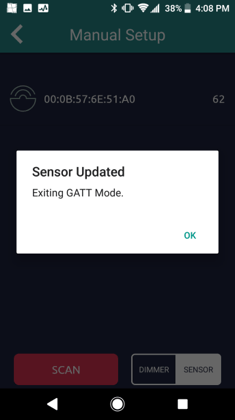
Finally, tap on OK to exit configuration.
Research.
Development.
Innovation.
The iConDimmer lighting solution app is now available for your smartphone.